Demystifying Container Runtimes
What is a “Container Runtime”?
The term “runtime” is traditionally regarded as the lifecycle phase when a program is running, or the specific implementation of a language that supports its execution. An example being the Go runtime. The latter meaning is closest to the definition of a “container runtime”. At its core, a container runtime is the software responsible for running containers. As we will described, different container runtimes implement varying levels of features; but running a container is all that’s required to classify something as a container runtime.
Docker
Docker is a popular monolithic platform for all things containers with niceties such as:
- A container image format
- A method for building container images (Dockerfile /
docker build) - A way to manage containers images (
docker images,docker rm, etc.) - A way to manage instances of containers (
docker ps,docker rm, etc.) - A way to share containers (
docker push/pull) - A way to run containers (
docker run)
However, none of these features are really dependent on each other. Each of these could be implemented in smaller, more focused tools that could be used together through a common format, a container standard. Because of this, the Open Container Initiative (OCI) was created. Docker then broke out these features and created a tool and library, runc, and donated it to OCI as a reference implementation of the OCI Runtime Implementation.
It was initially confusing what Docker had contributed to OCI. What they contributed was a standard way to “run” containers, nothing more. When you run a Docker container, these are the steps Docker actually goes through:
- Download the image.
- Unpack the image into a “bundle”. This flattens the layer into a single filesystem.
- Run the container from the bundle (what Docker actually standardized).
Low-Level & High-Level Container Runtimes
Examples of container runtimes include: runc, lxc, lmctfy, Docker (containerd), rkt, cri-o. Each of these is built for different situations and implements different features. Some, like containerd and cri-o, actually use runc to run the container but implement image management and APIs on top. You can think of these features which include image transport, image management, image unpacking, and APIs, as high-level features compared to runc’s low-level implementation.
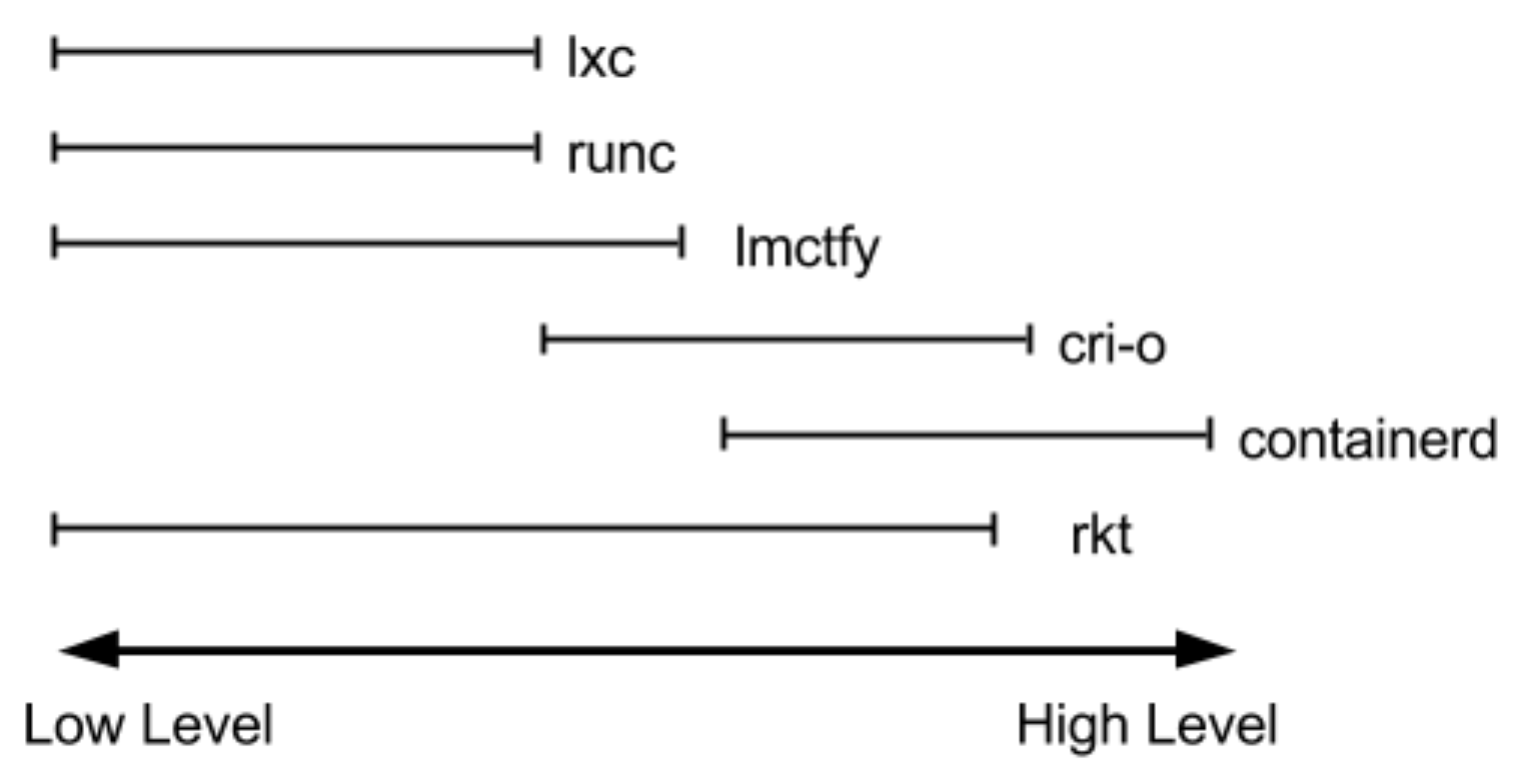
Therefore for practical purposes, actual container runtimes that focus on just running containers are referred to as “low-level container runtimes”. Runtimes that implement more higher-level features are usually referred to as “high-level container tools”, “high-level container runtimes”, or “container runtimes”. It’s important to note that low-level and high-level container runtimes are fundamentally different things that solve different problems.
What is a Container?
Containers are implemented using Linux namespaces and cgroups. Linux namespaces let you virtualize system resources, like the filesystem or networking, for each container. Cgroups provide a way to limit the amount of resources like CPU and memory that each container can use. At the lowest level, a container runtime is responsible for setting up these namespaces and cgroups for containers, and running commands inside though namespaces and cgroups. Low-level runtimes support using these operating system features.
Why Do We Need High-Level Container Runtimes?
Typically, developers who want to run applications in containers will need more than just the features the low-level runtimes provide. They need APIs and features around image formats, image management, and sharing images which are usually provided by high-level container runtimes. Low-level container runtimes just don’t provide enough features for this everyday use; for that reason, those who use low-level runtimes would be developers who implement higher-level runtimes, and tools for containers.
Developers who implement low-level runtimes will say that higher-level runtimes like containerd and cri-o are not actually container runtimes, as from their perspective they outsource the implementation of running a container to runc. But, from the user’s perspective, they are a singular component that provides the ability to run containers. One implementation can be swapped out by another, so it still makes sense to call it a runtime from that perspective.
Anatomy of a Low-Level Container Runtime
Low-level runtimes have a limited feature set and typically perform the low-level tasks required for running a container. They are usually implemented as simple tools or libraries that developers of higher level runtimes and tools can use for the low-level features.
Building a Sample Runtime
We can perform the steps using the standard Linux cgcreate, cgset, cgexec, chroot, and unshare commands.
First, let’s set up a root filesystem for our container. We’ll use the busybox Docker container as our base. Here we create a temporary directory and extract busybox into it.
CID=$(docker create busybox)
ROOTFS=$(mktemp -d)
docker export $CID | tar -xf - -C $ROOTFS
Now, let’s create our cgroup and set restrictions on the memory and CPU. Memory limits are set in bytes; here we are setting the limit to 100MB.
UUID=$(uuidgen)
cgreate -g cpu,memory:$UUID
cgset -r memory.limit_in_bytes=10000000 $UUID
cgset -r cpu.shares=512 $UUID
CPU usage can be restricted in one of two ways. Here we set our CPU limit using CPU “shares”. Shares are an amount of CPU time relative to other processes running at the same time. Containers running by themselves can use the whole CPU, but if other containers are running, they can use a proportional amount of CPU to their CPU shares.
CPU limits based on CPU cores are a bit more complicated. They let you set hard limits on the amount of CPU cores that a container can use. Limiting CPU cores requires you set two options on the cgroup, cfs_period_us and cfs_quota_us.cfs_period_us specifies how often CPU usage is checked and cfs_quota_us specifies the amount of time that a task can run on one core in one period. Both are specified in microseconds.
For instance, if we wanted to limit our container to two cores we could specify a period of one second and a quota of two seconds (one second is 1,000,000 microseconds) and this would effectively allow our process to use two cores during a one-second period.
cgset -r cpu.cfs_period_us=1000000 $UUID
cgset -r cpu.cfs_quota_us=2000000 $UUID
Next, we can execute a command in the container. This will execute the command within the cgroup we created, unshare the specified namespaces, set the hostname, and chroot to our filesystem.
cgexec -g cpu,memory:$UUID \
  unshare -uinpUrf --mount-proc \
  sh -c "/bin/hostname $UUID && chroot $ROOTFS /bin/sh"
  / # echo "Hello from in a container"
  Hello from in a container
  / # exit
Finally, after our command has completed, we can clean up by deleting the cgroup and temporary directory we created.
cgdelete -r -g cpu,memory:$UUID
rm -r $ROOTFS
Examples of Low-Level Container Runtimes
lmctfy
Though not in wide use, one container runtime of note is lmctfy. It is a project by Google based on the internal container runtime that Borg uses. One of its most interesting features is that it supports container hierarchies that use cgroup hierarchies via the container names. For example, a root container called “busybox” could create sub-containers under the name “busybox/sub1” or “busybox/sub2” where the names form a kind of path structure. As a result, each sub-container can have its own cgroups that are then limited by the parent container’s cgroup.
runc
runc is currently the most widely used container runtime. It was originally developed as part of Docker and was later extracted out as a separate tool and library. Internally, runc runs containers that implement the OCI runtime spec. That means that it runs containers from a specific “OCI bundle” format. The format of the bundle has a config.json file for some configuration and a root file system for the container.
First, create the root filesystem (here we’ll use busybox again).
mkdir rootfs
docker export $(docker create busyox) | tar -xf - -C rootfs
Next, create a config.json file.
runc spec
This command creates a template config.json for our container. It should look something like this:
{
  "ociVersion": "1.0.0",
  "process": {
          "terminal": true,
          "user": {
                  "uid": 0,
                  "gid": 0
          },
          "args": [
                  "sh"
          ],
          "env": [
                  "PATH=/usr/local/sbin:/usr/local/bin:/usr/sbin:/usr/bin:/sbin:/bin",
                  "TERM=xterm"
          ],
          "cwd": "/",
          "capabilities": {
...
By default, it runs the sh command in a container with a root filesystem at ./rootfs. Since that’s exactly the setup we want we can just go ahead and run the container; sudo runc run mycontainerid / # echo "Hello from in a container".
Anatomy of a High-Level Container Runtime
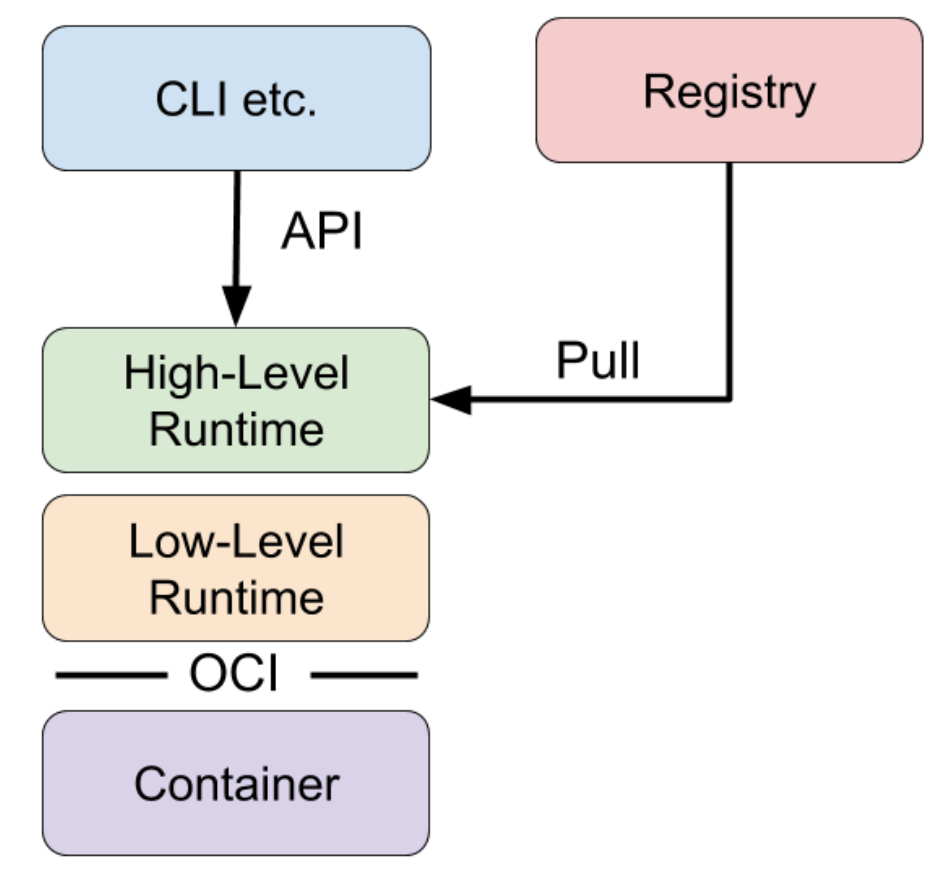
High-level runtimes are higher up the stack than low-level runtimes. While low-level runtimes are responsible for the mechanics of actually running a container, high-level runtimes are responsible for transport and management of container images, unpacking the image, and passing off to the low-level runtime to run the container. Typically, high-level runtimes provide an daemon application and an API that remote applications can use to logically run containers and monitor them but they set on top of and delegate to low-level runtimes or other high-level runtimes for the actual work.
High-level runtimes can also provide features that sound low-level, but are used across individual containers on a machine. For example, one feature might be the management of network namespaces, and allowing containers to join another container’s network namespace.
Here’s a conceptual diagram to understand how the components fit together:
Examples of High-Level Runtimes
Docker
Docker is one of the first open source container runtimes. It was developed by the platform-as-a-service company dotCloud, and was used to run their users' web applications in containers.
Docker is a container runtime that incorporates building, packaging, sharing, and running containers. Docker has a client/server architecture and was originally built as a monolithic daemon, dockerd, and the docker client application. The daemon provided most of the logic of building containers, managing images, and running containers, along with an API. The command line client could be run to send commands and to get information from the daemon. It was the first popular runtime to incorporate all of the features needed during the lifecycle of building and running containers.
Docker originally implemented both high-level and low-level runtime features, but those pieces have since been broken out into separate projects as runc and containerd. Docker now consists of the dockerd daemon, and the docker-containerd daemon along with docker-runc. docker-containerd and docker-runc are just Docker packaged versions of vanilla containerd and runc.
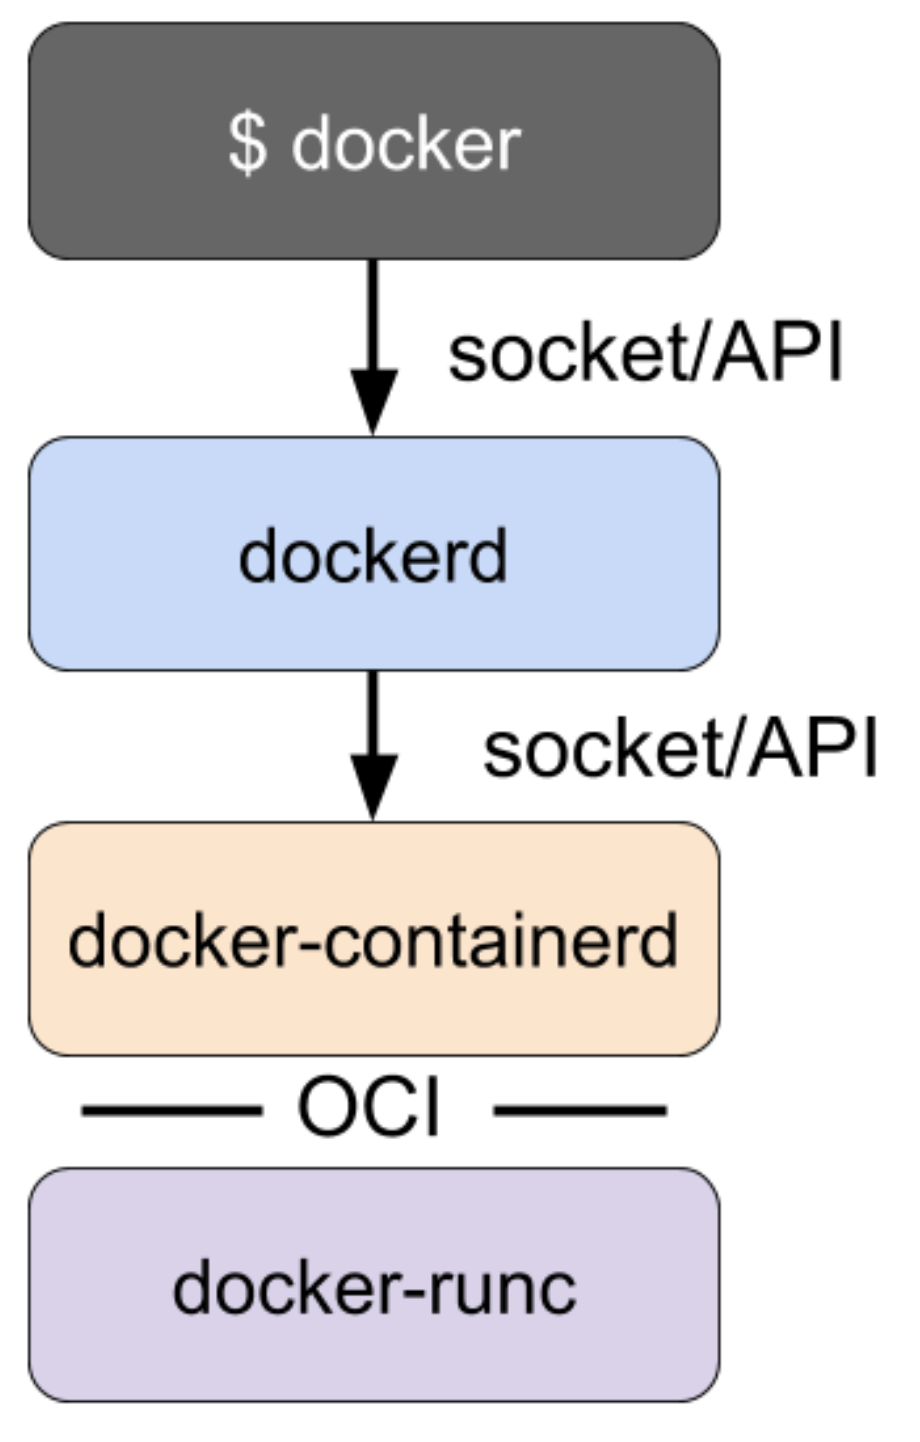
dockerd provides features such as building images and uses docker-containerd for image management and running containers. For instance, Docker’s build step is actually just some logic that interprets a Dockerfile, runs the necessary commands in a container using containerd, and saves the resulting container file system as an image.
containerd
containerd is a high-level runtime that was split off from Docker. Like runc, which was broken off as the low-level runtime piece, containerd was broken off as the high-level runtime piece of Docker. containerd implements downloading images, managing them, and running containers from images. When it needs to run a container, it unpacks the image into an OCI runtime bundle and shells out to runc to run it.
Containerd also provides an API and client application that can be used to interact with it. The containerd command line client is ctr which can be used to tell containerd to:
- Pull an image -
sudo ctr images pull docker.io/library/redis:latest, - List the images you have -
sudo ctr images list, - Run a container based on an image -
sudo ctr container create docker.io/library/redis:latest redis, - List the running containers -
sudo ctr containers list, and - Stop the container -
sudo ctr container delete redis.
These commands are similar to how a user interacts with Docker. However, in contrast with Docker, containerd is focused solely on running containers, so it does not provide a mechanism for building containers. Docker was focused on end-user and developer use cases, such as running containers on servers. Tasks such as building container images are left to other tools.
rkt
rkt is a runtime that has both low-level and high-level features. For instance, much like Docker, rkt allows you to build container images, fetch and manage container images in a local repository, and run them all from a single command. rkt stops short of Docker’s functionality, however, in that it doesn’t provide a long-running daemon and remote API.
- Fetch remote images -
sudo rkt fetch coreos.com/etcd:v3.3.10, - List the images installed locally -
sudo rkt image list, and - Delete images
sudo rkt image rm coreos.com/etcd:v3.3.10.
Though, rkt doesn’t seem to be actively developed very much anymore.
Kubernetes Container Runtimes & CRI
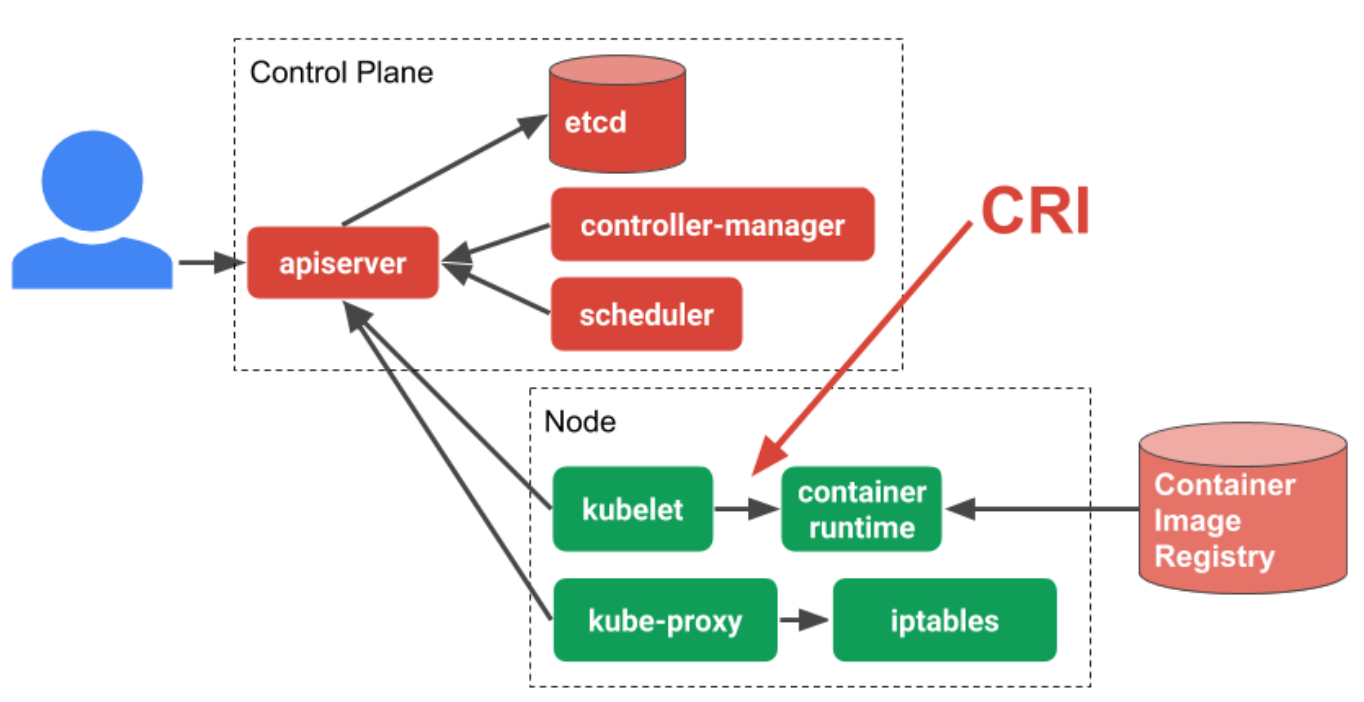
Kubernetes runtimes are high-level container runtimes that support the Container Runtime Interface (CRI). CRI was introduced in Kubernetes 1.5 and acts as a bridge between the kubelet and the container runtime. High-level container runtimes that want to integrate with Kubernetes are expected to implement CRI. The runtime is expected to handle the management of images and to support Kubernetes pods, as well as manages the individual containers so a Kubernetes runtime must be a high-level runtime. Low-level runtimes just don’t have the necessary features.
Container Runtime Interface (CRI)
In order to understand more about CRI it’s worth taking a look at the overall Kubernetes architecture. The kubelet is an agent that sits on each worker node in the Kubernetes cluster. The kubelet is responsible for managing the container workloads for its node. When it comes to actually run the workload, the kubelet uses CRI to communicate with the container runtime running on that same node. In this way, CRI is simply an abstraction layer or API that allows you to switch out container runtime implementations instead of having them built into the kubelet.
Examples of CRI Runtimes
Here are some CRI runtimes that can be used with Kubernetes.
containerd
containerd is possibly the most popular CRI runtime currently. It implements CRI as a plugin which is enabled by default. It listens on a Unix socket by default so you can configure ctictl to connect to containerd like this:
cat <<EOF | sudo tee /etc/crictl.yaml
runtime-endpoint: unix:///run/containerd/containerd.sock
EOF
It is an interesting high-level runtime in that it supports multiple low-level runtimes via something called a “runtime handler” starting in version 1.2. The runtime handler is passed via a field in CRI and based on that runtime handler, containerd runs an application called a shim to start the container. This can be used to run containers using low-level runtimes other than runc, like gVisor, Kata Containers, or Nabla Containers. The runtime handler is exposed in the Kubernetes API using the RuntimeClass object which is alpha in Kubernetes 1.12.
Docker
Docker support for CRI was the first to be developed and was implemented as a shim between the kubelet and Docker. Docker has since broken out many of its features into containerd and now supports CRI through containerd. When modern versions of Docker are installed, containerd is installed along with it and CRI talks directly to containerd. For that reason, Docker itself isn’t necessary to support CRI. So you can install containerd directly or via Docker depending on your use case.
cri-o
cri-o is a lightweight CRI runtime made as a Kubernetes specific high-level runtime. It supports the management of OCI compatible images and pulls from any OCI compatible image registry. It supports runc and Clear Containers as low-level runtimes. It supports other OCI compatible low-level runtimes in theory, but relies on compatibility with the runc OCI command line interface, so in practice it isn’t as flexible as containerd’s shim API.
cri-o’s endpoint is at /var/run/crio/crio.sock by default so you can configure crictl like so:
cat <<EOF | sudo tee /etc/crictl.yaml
runtime-endpoint: unix:///var/run/crio/crio.sock
EOF
The CRI Specification
CRI is a protocol buffers and gRPC API. The specification is defined in a protobuf file in the Kubernetes repository under the kubelet. CRI defines several remote procedure calls (RPCs) and message types. The RPCs are for operations like:
- “Pull Image” -
ImageServer.PullImage, - “Create Pod” -
RuntimeServer.RunPodSandbox, - “Create Container” -
RuntimeService.CreateContainer, - “Start Container” -
RuntimeService.StartContainer, - “Stop Container” -
RuntimeService.StopContainer, etc.
We can interact with a CRI runtime directly using the crictl tool. crictl lets us send gRPC messages to a CRI runtime directly from the command line. We can use this to debug and test out CRI implementations without starting up a full-blown kubelet or Kubernetes cluster.
You can configure crictl by creating a configuration file under /etc/crictl.yaml. Here you should specify the runtime’s gRPC endpoints as either a Unix socket file (unix:///path/to/file) or a TCP endpoint (tcp://<host>:<port>). We will use containerd for this example:
cat <<EOF | sudo tee /etc/crictl.yaml
runtime-endpoint: unix:///run/containerd/containerd.sock
EOF
Or, you can specify the runtime endpoint on each command lin execution:
crictl --runtime-endpoint unix:///run/containerd/containerd.sock ...
Let’s run a pod with a single container with crictl. First, you would need to tell the runtime to pull the nginx image you need since you can’t start a container without the image stored locally; sudo crictl pull nginx.
Next, create a Pod creation request. You can do this as a JSON file.
cat <<EOF | tee sandbox.json
{
    "metadata": {
        "name": "nginx-sandbox",
        "namespace": "default",
        "attempt": 1,
        "uid": "hdishd83djaidwnduwk28bcsb"
    },
    "linux": {
    },
    "log_directory": "/tmp"
}
EOF
And then create the pod sandbox. We wil store the ID of the sandbox as SANDBOX_ID; SANDBOX_ID=$(sudo crictl runp --runtime runsc sandbox.json).
Next, we will create the container creation request in a JSON file.
cat <<EOF | tee container.json
{
  "metadata": {
      "name": "nginx"
    },
  "image":{
      "image": "nginx"
    },
  "log_path":"nginx.0.log",
  "linux": {
  }
}
EOF
We can then create and start the container inside the Pod we created earlier.
{
  CONTAINER_ID=$(sudo crictl create ${SANDBOX_ID} container.json sandbox.json)
  sudo crictl start ${CONTAINER_ID}
}
You can inspect the running pod; sudo crictl inspectp ${SANDBOX_ID} and the running container; sudo crictl inspect {CONTAINER_ID}.
Clean up by stopping and deleting the container:
{
  sudo crictl stop ${CONTAINER_ID}
  sudo crictl rm ${CONTAINER_ID}
}
And then stop and delete the Pod:
{
  sudo crictl stopp ${SANDBOX_ID}
  sudo crictl rmp ${SANDBOX_ID}
}
Sources
Container Runtimes Part 1: An Introduction to Container Runtimes Container Runtimes Part 2: Anatomy of a Low-Level Container Runtime Container Runtimes Part 3: High-Level Runtimes Container Runtimes Part 4: Kubernetes Container Runtimes & CRI